Using Unity Relay
With Netcode for GameObjects you can use an IP address and a port to connect a client to a host over the internet. However, using an IP address to establish a connection doesn't always work. Instead, you can use Unity Relay to initiate a connection between multiple clients and a host.
Many factors impact how you connect to the remote host. To connect to a remote host, use one of the following methods:
- Perform a NAT punchthrough: This advanced technique directly connects to the host computer, even if it's on another network.
- Use a relay server: A relay server exists on the internet with a public-facing IP that you and the host can access. After the client and the host connect to a relay server, they can send data to each other through the relay server.
Netcode for GameObjects doesn't offer tools to help you punch through a NAT. However, you can use the Unity Relay service to relay all technology based on Unity Transport.
Using Unity Relay
To access a Unity Relay server, do the following:
- As the host, request an allocation on the relay server.
- As a client, use the join code that the host creates to connect to the relay server. This code allows the host and clients to communicate through the relay server without disclosing their IP addresses and ports directly.
Enable Unity Relay in a project
To enable and set up Unity Relay in a project, follow the steps in Get started with Relay.
Test the Unity Relay service in the Unity Editor
From Unity version 2022.3, you can test the Relay service with Netcode for GameObjects in the Editor. To do this, do the following:
- Follow the steps in Get started with Netcode for GameObjects.
- Follow the steps in Get started with Relay.
- Open the inspector window and select the Network Manager.
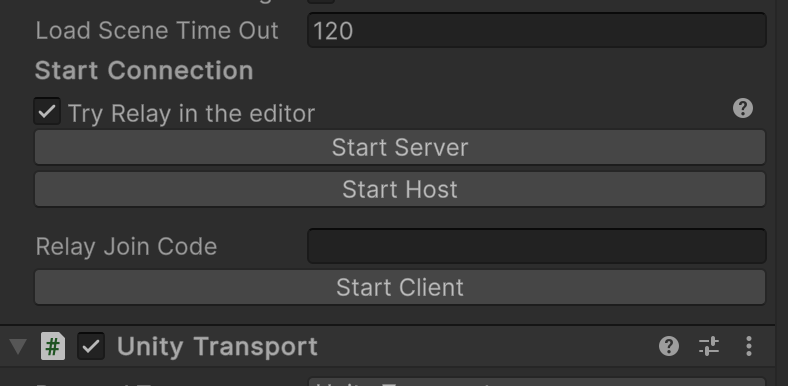
- Navigate to the Start Connection section.
- Check the Try Relay in the editor box.
- Select Start Server or Start Host to start the server or host.
- In the inspector, copy the join code.
- Enter the join code in a new window running the same project.
- Select Start Client.
This means you don't need to create UI elements to test the Relay service.
If the connection fails then an error message appears in the UI and console.
If Relay connects, a message appears in the inspector that displays the join code.
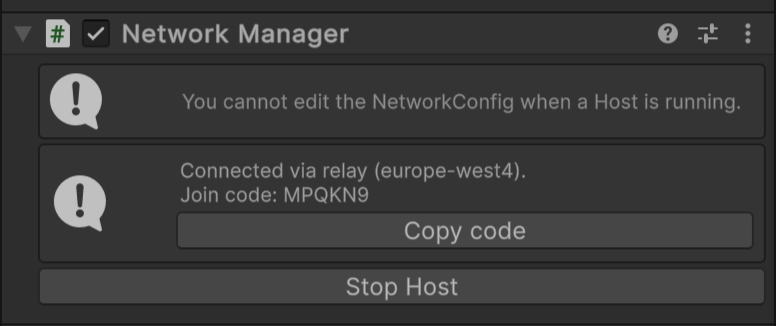
You can copy the join code to share it, or test it in a project in a separate window. Refer to testing locally for more details.
This Relay integration is only available in the Editor, which means you can't use it in a build. Instead, use the code snippets at the end of this page. These snippets use the Unity Transport Package. To do this in projects that don't use Transport, refer to the Relay documentation.
Create an allocation on a Relay server
To create an allocation on a Relay server, make an authenticated call to the Unity backend using the SDK. To do this, call the CreateAllocationAsync method on the host with the maximum number of expected peers. For example, a host that requests a maximum of three peer connections reserves four slots for a four-player game. This function can throw exceptions, which you can catch to learn about the error that caused them.
//Ask Unity Services to allocate a Relay server that will handle up to eight players: seven peers and the host.
Allocation allocation = await Unity.Services.Relay.RelayService.Instance.CreateAllocationAsync(7);
The Allocation class represents all the necessary data for a host player to start hosting using the specific Relay server allocated. You don't need to understand each part of this allocation; you only need to feed them to your chosen transport that handles the Relay communication on its own. For reference, here's a simple overview of those parameters:
A
RelayServerclass containing the IP and port of your allocation's server.The allocation ID in a Base64 form and GUID form referred to as
AllocationIdBytesandAllocationId.A blob of encrypted bytes representing the connection data (known as
ConnectionData) allows users to connect to this host.A Base64 encoded
Keyfor message signature.
Each allocation creates a unique join code suitable for sharing over instant messages or other means. This join code allows your clients to join your game. You can retrieve it by calling the Relay SDK like so:
string joinCode = await Unity.Services.Relay.RelayService.Instance.GetJoinCodeAsync(allocation.AllocationId);
With those two calls, you now have your Relay allocation ready and the associated join code. Pass the allocation parameters to your host transport and send the join code (a simple string) over the Internet by the mean of your choice to your clients.
Remember to authenticate your users before using SDK methods. The easiest way is the anonymous one (shown in the following code snippet), but you can use more advanced techniques.
//Initialize the Unity Services engine
await UnityServices.InitializeAsync();
if (!AuthenticationService.Instance.IsSignedIn)
{
    //If not already logged, log the user in
    await AuthenticationService.Instance.SignInAnonymouslyAsync();
}
Join an allocation on a Relay server
To join an allocation on a Relay server, the following must be true:
- The host of the game has created a Relay allocation.
- The client has received a join code.
To join a relay, a client requests all the allocation parameters from the join code to join the game. To do this, use the join code to call the JoinAllocationAsync method as the following code snippet demonstrates:
//Ask Unity Services to join a Relay allocation based on our join code
JoinAllocation allocation = await Unity.Services.Relay.RelayService.Instance.JoinAllocationAsync(joinCode);
For more information about the join code connection process, refer to Connection flow.
Pass allocation data to a transport component
When an allocation exists, you need to make all traffic that comes from Netcode for GameObjects go through the Relay. To do this, perform the following actions to pass the allocation parameters to UnityTransport:
- Retrieve Unity transport from your
NetworkManager:
//Retrieve the Unity transport used by the NetworkManager
UnityTransport transport = NetworkManager.Singleton.gameObject.GetComponent<UnityTransport>();
- Call the
SetRelayServerDatamethod on the retrieved transport by passing the allocation data that you retrieved, as well as the connection type (here set to dtls). For example:
transport.SetRelayServerData(new RelayServerData(allocation, connectionType:"dtls"));
- Call
StartClient,StartHostorStartServerand use the Netcode library.
Code sample
Use the following code to work with the Relay server. To start a server instead of a host, replace the StartHost call with StartServer in StartHostWithRelay.
For more information, refer to Unity Relay.
/// <summary>
/// Creates a relay server allocation and start a host
/// </summary>
/// <param name="maxConnections">The maximum amount of clients that can connect to the relay</param>
/// <returns>The join code</returns>
public async Task<string> StartHostWithRelay(int maxConnections=5)
{
    //Initialize the Unity Services engine
    await UnityServices.InitializeAsync();
    //Always authenticate your users beforehand
    if (!AuthenticationService.Instance.IsSignedIn)
    {
        //If not already logged, log the user in
        await AuthenticationService.Instance.SignInAnonymouslyAsync();
    }

    // Request allocation and join code
    Allocation allocation = await RelayService.Instance.CreateAllocationAsync(maxConnections);
    var joinCode = await RelayService.Instance.GetJoinCodeAsync(allocation.AllocationId);
    // Configure transport
    NetworkManager.Singleton.GetComponent<UnityTransport>().SetRelayServerData(new RelayServerData(allocation, "dtls"));
    // Start host
    return NetworkManager.Singleton.StartHost() ? joinCode : null;
}

/// <summary>
/// Join a Relay server based on the JoinCode received from the Host or Server
/// </summary>
/// <param name="joinCode">The join code generated on the host or server</param>
/// <returns>True if the connection was successful</returns>
public async Task<bool> StartClientWithRelay(string joinCode)
{
    //Initialize the Unity Services engine
    await UnityServices.InitializeAsync();
    //Always authenticate your users beforehand
    if (!AuthenticationService.Instance.IsSignedIn)
    {
        //If not already logged, log the user in
        await AuthenticationService.Instance.SignInAnonymouslyAsync();
    }

    // Join allocation
    var joinAllocation = await RelayService.Instance.JoinAllocationAsync(joinCode: joinCode);
    // Configure transport
    NetworkManager.Singleton.GetComponent<UnityTransport>().SetRelayServerData(new RelayServerData(joinAllocation, "dtls"));
    // Start client
    return !string.IsNullOrEmpty(joinCode) && NetworkManager.Singleton.StartClient();
}