NetworkObject
Netcode for GameObjects' high level components, the RPC system, object spawning, and NetworkVariables all rely on there being at least two Netcode components added to a GameObject:
NetworkObjectNetworkBehaviour
Both the NetworkObject and NetworkBehaviour components require the use of specialized structures before you can serialize and use them with RPCs and NetworkVariables:
- For NetworkObjects, use the
NetworkObjectReference. - For NetworkBehaviours, use the
NetworkBehaviourReference.
NetworkObject
To replicate any Netcode aware properties or send/receive RPCs, a GameObject must have a NetworkObject component and at least one NetworkBehaviour component. Any Netcode-related component, such as a NetworkTransform or a NetworkBehaviour with one or more NetworkVariables or RPCs, requires a NetworkObject component on the same relative GameObject (or on a parent of the GameObject in question).
When spawning a NetworkObject, the NetworkObject.GlobalObjectIdHash value initially identifies the associated network Prefab asset clients instantiate to create a client-local clone. After instantiated locally, each NetworkObject is assigned a NetworkObjectId that's used to associate NetworkObjects across the network. For example, one peer can say "Send this RPC to the object with the NetworkObjectId 103," and everyone knows what object it's referring to. A NetworkObject is spawned on a client is when it's instantiated and assigned a unique NetworkObjectId.
NetworkBehaviours offer users with the ability to add their own custom Netcode logic to the associated NetworkObject.
The order of networked objects matters. Make sure to load any NetworkBehaviour components before the Network Object component on the GameObject.
Ownership
Either the server (default) or any connected and approved client each NetworkObject. Netcode for GameObjects is server-authoritative, which means the server controls (the only system authorized) spawning and despawning NetworkObjects.
Invoke all code snippets below on the server-side.
The default NetworkObject.Spawn method assumes server-side ownership:
GetComponent<NetworkObject>().Spawn();
To spawn NetworkObjects with ownership use the following:
GetComponent<NetworkObject>().SpawnWithOwnership(clientId);
To change ownership, use the ChangeOwnership method:
GetComponent<NetworkObject>().ChangeOwnership(clientId);
To give ownership back to the server use the RemoveOwnership method:
GetComponent<NetworkObject>().RemoveOwnership();
To decide if the local client is the owner of a NetworkObject, you can check the NetworkBehaviour.IsOwner property.
To decide if the server owns the NetworkObject, you can check the NetworkBehaviour.IsOwnedByServer property.
When you want to de-spawn and destroy the owner but you don't want to destroy a specific NetworkObject along with the owner, you can set the NetworkObject.DontDestroyWithOwner property to true which assures that the owned NetworkObject isn't destroyed with the owner.
Player NetworkObjects
Player objects are an optional feature in Netcode you can use to assign a networked object to a specific client. A client can always only have at most one player object.
If you want a client to control more than on NetworkObject, use the ownership methods described above under the ownership section.
If you want to be able to assign a unique player Prefab on a per client connection basis, use client connection approval.
Creating a PlayerObject
Netcode can spawn a default PlayerObject for you. If you enable Create Player Prefab (true) in the NetworkManager and you assign a valid Prefab to the Player Prefab, then Netcode spawns a unique instance of the designated player Prefab for each connected and approved client.
To manually spawn an object as PlayerObject, use the following method:
GetComponent<NetworkObject>().SpawnAsPlayerObject(clientId);
If the player already had a Prefab instance assigned, then the client owns the NetworkObject of that Prefab instance unless there's additional server-side specific user code that removes or changes the ownership.
Finding PlayerObjects
To find a PlayerObjects for a specific client ID, you can use the following methods:
Within a NetworkBehaviour, you can check the local NetworkManager.LocalClient to get the local PlayerObjects:
NetworkManager.LocalClient.PlayerObject
Conversely, on the server-side, if you need to get the PlayerObject instance for a specific client, you can use the following:
NetworkManager.Singleton.ConnectedClients[clientId].PlayerObject;
To find your own player object just pass NetworkManager.Singleton.LocalClientId as the clientId in the sample above.
Network Prefabs
Network Prefabs are registered to a NetworkPrefabsList object (a type of ScriptableObject). By default, a Default Prefabs List containing every Network Prefab in your project.
However, when you want to limit which prefabs are available (for example, to reduce memory usage), you can disable this behavior in Project Settings > Netcode For GameObjects > Project Settings. You can also manually create a NetworkPrefabsList by right-clicking in the assets view and selecting Create > Netcode > Network Prefabs List and adding your prefabs to it. That prefab list can then be assigned to a NetworkManager to allow that NetworkManager to create those prefabs.
You can only have one NetworkObject at the root of a Prefab. Don't create Prefabs with nested NetworkObjects!
Transform Synchronization
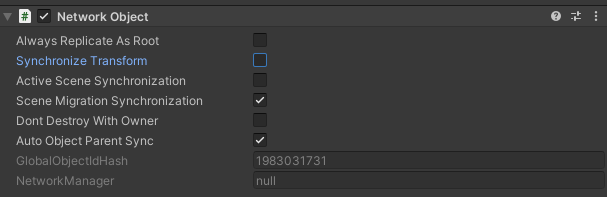
There are times when you want to use a NetworkObject for something that does not require the synchronization of its transform. You might have an In-Scene placed NetworkObject that is purely used to manage game state (or the like) and it doesn't make sense to incur the initial client synchronization cost of synchronizing its transform. To prevent a NetworkObject from initially synchronizing its transform when spawned, un-check the Synchronize Transform property. This property is enabled/checked by default.
If you are planning to use a NetworkTransform then you always want to make sure the Synchronize Transform property is enabled/checked.
Active Scene Synchronization
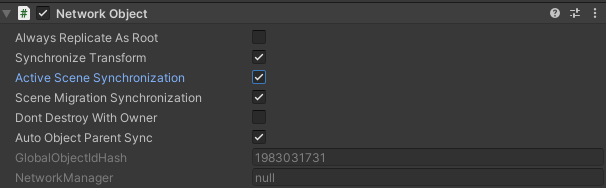
When a GameObject is instantiated it gets instantiated in the current active scene. However, sometimes you might find that you want to change the currently active scene and would like specific NetworkObject instances to automatically migrate to the newly assigned active scene. While you could keep a list or table of the NetworkObject instances and write the code/logic to migrate them into a newly assigned active scene, this can be time consuming an become complicated depending upon project size and complexity. The alternate way (and recommended) to handle this is by enabling/checking the Active Scene Synchronization property of each NetworkObject you want to automatically migrate into any newly assigned scene. This property defaults to disabled/un-checked.
See Also: NetworkSceneManager Active Scene Synchronization
Scene Migration Synchronization

Similar to NetworkObject.ActiveSceneSynchronization, this property will automatically synchronize client-side NetworkObject instances that are migrated to a scene via SceneManager.MoveGameObjectToScene on the host or server side. This can be useful if you have a specific scene you wish to migrate NetworkObject instances to that is not the currently active scene.
NetworkObject.ActiveSceneSynchronization can be used with NetworkObject.SceneMigrationSynchronization as long as you take into consideration that if you migrate a NetworkObject into a non-active scene via SceneManager.MoveGameObjectToScene and then later change the active scene then the NetworkObject instance will be automatically migrated to the newly set active scene.