Connection approval
With every new connection, Netcode for GameObjects (Netcode) performs a handshake in addition to handshakes done by the transport. This ensures the NetworkConfig on the client matches the server's NetworkConfig. You can enable ConnectionApproval in the NetworkManager or via code by setting NetworkManager.NetworkConfig.ConnectionApproval to true.
Connection approval allows you to decide, on a per connection basis, whether to allow a connection. Connection approval also enables you to specify the player Prefab to create, allowing you to override the default NetworkManager defined player Prefab on a per player basis. By setting ConnectionApproval property of the NetworkManager to true, Netcode checks to make sure the NetworkManager.ConnectionApprovalCallback has been assigned. If assigned, Netcode uses the connection approval process for connecting clients whether to allow a connection or deny it.
Netcode for GameObjects (NGO) does not encrypt or authenticate any of the raw information sent over connection approval. To prevent man-in-the-middle attacks, you should AVOID sending authentication tokens (such as Steam tickets or user passwords) over connection approval without additional safety precautions.
The examples in this article are to illustrate how NGO does not protect any connection data, and does not show how to incorporate encryption, authentication, or some other method of data security.
If you don't assign the NetworkManager.ConnectionApprovalCallback (even with the NetworkManager.ConnectionApprovalCallback set to true), Netcode uses basic authentication for the user, which automatically authorizes and assigns the default player Prefab).
NetworkManager.ConnectionApprovalRequest
This class represents the client-to-server request which has:
- ClientNetworkId: the connecting client identifier
- Payload: any additional user defined connection data
NetworkManager.ConnectionApprovalResponse
This is how the connection approval response is formed by server-side specific user code in the handler assigned to NetworkManager.ConnectionApprovalCallback. On the server side, this class has all the connection approval response information required to either allow or reject a player attempting to connect. It also has the following properties:
- Approved: When
true, the player is approved andfalsethe player is denied. - CreatePlayerObject: When
true, the server spawns a player Prefab for the connecting client and whenfalse, the connecting client will have no player Prefab spawned. - PlayerPrefabHash: The type of player Prefab to use for the authorized player (if this is
null, it uses the default NetworkManager defined player Prefab) - Position and Rotation: The position and rotation of the player when spawned.
- Pending: Provides the ability to mark the approval as pending to delay the authorization until other user-specific code finishes the approval process.
- Reason: If
Approvedisfalse, you can populate this with a string-based message (or JSON) to send the reason the client wasn't approved.
Unlike earlier versions of Netcode for GameObjects where users provided a callback to invoke within the connection approval handler method, users now only need to set the appropriate properties of the NetworkManager.ConnectionApprovalResponse class. Part of this update allows users to set their ConnectionApprovalResponse to Pending which provides users extra time to process any other tasks involved with the player approval process.
Server side connection approval example
using Unity.Netcode;

private void Setup()
{
    NetworkManager.Singleton.ConnectionApprovalCallback = ApprovalCheck;
    NetworkManager.Singleton.StartHost();
}

private void ApprovalCheck(NetworkManager.ConnectionApprovalRequest request, NetworkManager.ConnectionApprovalResponse response)
{
    // The client identifier to be authenticated
    var clientId = request.ClientNetworkId;

    // Additional connection data defined by user code
    var connectionData = request.Payload;

    // Your approval logic determines the following values
    response.Approved = true;
    response.CreatePlayerObject = true;

    // The Prefab hash value of the NetworkPrefab, if null the default NetworkManager player Prefab is used
    response.PlayerPrefabHash = null;

    // Position to spawn the player object (if null it uses default of Vector3.zero)
    response.Position = Vector3.zero;

    // Rotation to spawn the player object (if null it uses the default of Quaternion.identity)
    response.Rotation = Quaternion.identity;

    // If response.Approved is false, you can provide a message that explains the reason why via ConnectionApprovalResponse.Reason
    // On the client-side, NetworkManager.DisconnectReason will be populated with this message via DisconnectReasonMessage
    response.Reason = "Some reason for not approving the client";

    // If additional approval steps are needed, set this to true until the additional steps are complete
    // once it transitions from true to false the connection approval response will be processed.
    response.Pending = false;
}
Sending an approval declined reason (NetworkManager.ConnectionApprovalResponse.Reason)
Under the condition that you need to deny a player from connecting for any reason (such as if they reached the maximum number of connections or provided an invalid authorization), the NetworkManager.ConnectionApprovalResponse structure provides you with the optional NetworkManager.ConnectionApprovalResponse.Reason property.
When NetworkManager.ConnectionApprovalResponse.Approved is false and NetworkManager.ConnectionApprovalResponse.Reason is populated with the reason for denying the player's request to connect, the server sends the client a DisconnectReasonMessage. Upon the client side receiving the DisconnectReasonMessage, the NetworkManager.DisconnectReason property populates with the NetworkManager.ConnectionApprovalResponse.Reason message. The example below shows how this works:
using UnityEngine;
using Unity.Netcode;

/// <summary>
/// Connection Approval Handler Component
/// </summary>
/// <remarks>
/// This should be placed on the same GameObject as the NetworkManager.
/// It automatically declines the client connection for example purposes.
/// </remarks>
public class ConnectionApprovalHandler : MonoBehaviour
{
    private NetworkManager m_NetworkManager;

    private void Start()
    {
        m_NetworkManager = GetComponent<NetworkManager>();
        if (m_NetworkManager != null)
        {
            m_NetworkManager.OnClientDisconnectCallback += OnClientDisconnectCallback;
            m_NetworkManager.ConnectionApprovalCallback = ApprovalCheck;
        }
    }

    private void ApprovalCheck(NetworkManager.ConnectionApprovalRequest request, NetworkManager.ConnectionApprovalResponse response)
    {
        response.Approved = false;
        response.Reason = "Testing the declined approval message";
    }

    private void OnClientDisconnectCallback(ulong obj)
    {
        if (!m_NetworkManager.IsServer && m_NetworkManager.DisconnectReason != string.Empty)
        {
            Debug.Log($"Approval Declined Reason: {m_NetworkManager.DisconnectReason}");
        }
    }
}
Connection data (NetworkManager.ConnectionApprovalRequest.Payload)
The ConnectionApprovalRequest.Payload parameter takes any custom data the client should send to the server. Usually, this data should be some sort of ticket, room password, or similar that helps the server decide whether to approve a connection. The connectionData is specified on the client-side in the NetworkingConfig (supplied when connecting). The NetworkConfig.ConnectionData, automatically sent with the connection request message to the server, should be populated on the client-side before calling NetworkManager.StartClient.
Example:
using Unity.Netcode;

NetworkManager.Singleton.NetworkConfig.ConnectionData = System.Text.Encoding.ASCII.GetBytes("room password");
NetworkManager.Singleton.StartClient();
The Payload, defined by the client-side NetworkConfig.ConnectionData, is sent to the server as part of the Payload of the connection request message that's used on the server-side to decide if the client is approved or not. The connection data is optional and you can use the connection approval process to assign player's unique Prefabs and facilitates the ability to spawn players at various locations (without requiring the client to send any form of connection data).
Timeout
Netcode uses a callback system to allow for external validation. For example, you might have a steam authentication ticket sent as the ConnectionData that you want to validate against steam servers. This can take some time, so you will want to set the NetworkManager.ConnectionApprovalResponse.Pending to true while the steam server (or other third party authentication service) occurs.
If the third party authentication process (steam servers) takes longer than the time specified by the NetworkConfig.ClientConnectionBufferTimeout, then the connection is dropped. The timer for this starts when the server is notified of the new inbound client connection. You can set the Client Connection Buffer Timeout value via the NetworkManager in the Inspector view or with the NetworkManager.NetworkConfig.ClientConnectionBufferTimeout property.
Security
If you enable connection approval, the server silently ignores any messages sent before a connection is setup.
Connection data security
The connection data isn't encrypted or authenticated.
Netcode for GameObjects (NGO) does not encrypt or authenticate any of the raw information sent over connection approval. To prevent man-in-the-middle attacks, you should AVOID sending authentication tokens (such as Steam tickets or user passwords) over connection approval without additional safety precautions.
The examples in this article are to illustrate how NGO does not protect any connection data, and does not show how to incorporate encryption, authentication, or some other method of data security.
Changing the player Prefab
There might be times when you want to specify an alternate player Prefab to use for a player connecting. The connection approval process provides you with the ability to do this.
Step 1: Modify/Create an in-scene placed connection approval component
    public class ClientConnectionHandler : NetworkBehaviour
    {
        public List<uint> AlternatePlayerPrefabs;

        public void SetClientPlayerPrefab(int index)
        {
            if (index > AlternatePlayerPrefabs.Count)
            {
                Debug.LogError($"Trying to assign player Prefab index of {index} when there are only {AlternatePlayerPrefabs.Count} entries!");
                return;
            }
            if (NetworkManager.IsListening || IsSpawned)
            {
                Debug.LogError("This needs to be set this before connecting!");
                return;
            }
            NetworkManager.NetworkConfig.ConnectionData = System.BitConverter.GetBytes(index);
        }

        public override void OnNetworkSpawn()
        {
            if (IsServer)
            {
                NetworkManager.ConnectionApprovalCallback = ConnectionApprovalCallback;
            }
        }

        private void ConnectionApprovalCallback(NetworkManager.ConnectionApprovalRequest request, NetworkManager.ConnectionApprovalResponse response)
        {
            var playerPrefabIndex = System.BitConverter.ToInt32(request.Payload);
            if (AlternatePlayerPrefabs.Count < playerPrefabIndex)
            {
                response.PlayerPrefabHash = AlternatePlayerPrefabs[playerPrefabIndex];
            }
            else
            {
                Debug.LogError($"Client provided player Prefab index of {playerPrefabIndex} when there are only {AlternatePlayerPrefabs.Count} entries!");
                return;
            }
            // Continue filling out the response
        }
    }
The above example creates a list of unsigned integers to store an alternate player Prefab GlobalObjectIdHash values (AlternatePlayerPrefabs). For example purposes, this code sample adds a public method that a client can invoke to set their selected player Prefab's index that's relative to AlternatePlayerPrefabs (you can do this in some other component). The general idea for this approach is that the client provides the server with the alternate player Prefab index that the player whishes to use.
The server assigns the ConnectionApprovalCallback when it spawns the in-scene placed NetworkObject that the ClientConnectionHandler is attached to. When the server handles a connection request, it grabs the alternate player Prefab index from the request's Payload field and then obtains the GlobalObjectIdHash value from the AlternatePlayerPrefabs list and assigns that to the response.PlayerPrefabHash.
Step 2: copy the alternate player Prefab's GlobalObjectIdHash value
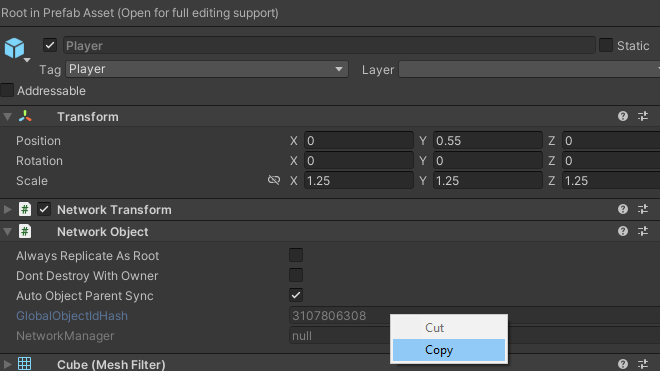
To populate the AlternatePlayerPrefabs list:
- Open the scene containing the in-scene placed NetworkObject that the
ConnectionApprovalCallbackis attached to. - Find each alternate player Prefab you wish to add to the list, select the Prefab (but don't open it), and copy the GlobalObjectIdHash value by right-clicking and selecting Copy.
- Paste the copied GlobalObjectIdHash value into a new list item entry in the AlternatePlayerPrefabs list.
Step 3: Assign client's selected player Prefab index
This part is up to your project's design. The example includes a method that clients can invoke, but that also requires the client to have that scene loaded. You can choose to have a ScriptableObject that has the list of alternate player Prefab GlobalObjectIdHash values and share that between components (this would require you to change the AlternatePlayerPrefabs to a reference of the ScriptableObject). The general idea is to have the client populate the NetworkConfig.ConnectionData before starting.
An alternate way to handle this is by using a generic player Prefab that's used as the parent to the actual player's character and allowing the player to select their player once they're connected. This involves dynamically spawning the player's selected character with the client as the owner and parenting that under the player's generic player Prefab instance.
Suggested Reading:
NetworkObject Parenting
Session Management