Create minimal client and server
This Transport workflow covers all aspects of the Unity.Networking.Transport package and helps you create a sample project that highlights how to use the com.unity.transport API to:
- Configure
- Connect
- Send data
- Receive data
- Close a connection
- Disconnect
- Timeout a connection
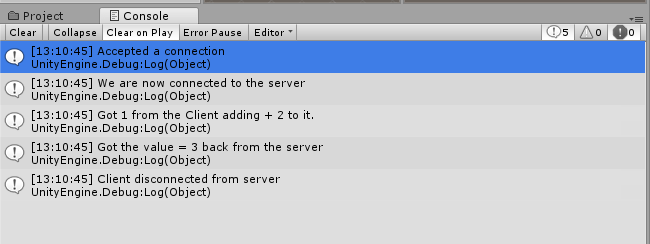
The goal is to make a remote add function. The flow will be: a client connects to the server, and sends a number, this number is then received by the server that adds another number to it and sends it back to the client. The client, upon receiving the number, disconnects and quits.
Using the NetworkDriver to write client and server code is similar between clients and servers; there are a few subtle differences demonstrated in this guide.
Creating a Server
A server is an endpoint that listens for incoming connection requests and sends and receives messages.
Start by creating a C# script in the Unity Editor.
Filename: Assets\Scripts\ServerBehaviour.cs
using System.Collections;
using System.Collections.Generic;
using UnityEngine;

public class ServerBehaviour : MonoBehaviour {

    // Use this for initialization
    void Start () {

    }

    // Update is called once per frame
    void Update () {

    }
}
Boilerplate code
As the com.unity.transport package is a low level API, there is a bit of boiler plate code you might want to setup. This is an architecture design Unity chose to make sure that you always have full control.
As development on the com.unity.transport package evolves, more abstractions may be created to reduce your workload on a day-to-day basis.
The next step is to clean up the dependencies and add our boilerplate code:
Filename: Assets\Scripts\ServerBehaviour.cs
using UnityEngine;
using UnityEngine.Assertions;

using Unity.Collections;
using Unity.Networking.Transport;

...
Code walkthrough
ServerBehaviour.cs
Adding the members we need the following code:
Filename: Assets\Scripts\ServerBehaviour.cs
using ...

public class ServerBehaviour : MonoBehaviour {

    public NetworkDriver m_Driver;
    private NativeList<NetworkConnection> m_Connections;

    void Start () {
    }

    void OnDestroy() {
    }

    void Update () {
    }
Code walkthrough
public NetworkDriver m_Driver;
private NativeList<NetworkConnection> m_Connections;
You need to declare a NetworkDriver. You also need to create a NativeList to hold our connections.
Start method
Filename: Assets\Scripts\ServerBehaviour.cs
void Start ()
{
    m_Driver = NetworkDriver.Create();
    var endpoint = NetworkEndPoint.AnyIpv4;
    endpoint.Port = 9000;
    if (m_Driver.Bind(endpoint) != 0)
        Debug.Log("Failed to bind to port 9000");
    else
        m_Driver.Listen();

    m_Connections = new NativeList<NetworkConnection>(16, Allocator.Persistent);
}
Code walkthrough
The first line of code, m_Driver = NetworkDriver.Create();, just makes sure you are creating your driver without any parameters.
    if (m_Driver.Bind(endpoint) != 0)
        Debug.Log("Failed to bind to port 9000");
    else
        m_Driver.Listen();
Then we try to bind our driver to a specific network address and port, and if that does not fail, we call the Listen method.
the call to the Listen method sets the NetworkDriver to the Listen state. This means that the NetworkDriver will now actively listen for incoming connections.
m_Connections = new NativeList<NetworkConnection>(16, Allocator.Persistent);
Finally we create a NativeList to hold all the connections.
OnDestroy method
Both NetworkDriver and NativeList allocate unmanaged memory and need to be disposed. To make sure this happens we can simply call the Dispose method when we are done with both of them.
Add the following code to the OnDestroy method on your MonoBehaviour:
Filename: Assets\Scripts\ServerBehaviour.cs
public void OnDestroy()
{
    if (m_Driver.IsCreated)
    {
        m_Driver.Dispose();
        m_Connections.Dispose();
    }
}
The check for m_Driver.IsCreated ensures we don't dispose of the memory if it hasn't been allocated (for example, if the component is disabled).
Server Update loop
As the com.unity.transport package uses the Unity C# Job System internally, the m_Driver has a ScheduleUpdate method call. Inside our Update loop you need to make sure to call the Complete method on the JobHandle that is returned, to know when you are ready to process any updates.
void Update () {

    m_Driver.ScheduleUpdate().Complete();
In this example, we are forcing a synchronization on the main thread to update and handle our data later in the MonoBehaviour::Update call. The workflow Creating a jobified client and server shows you how to use the Transport package with the C# Job System.
The first thing we want to do, after you have updated your m_Driver, is to handle your connections. Start by cleaning up any old stale connections from the list before processing any new ones. This cleanup ensures that, when we iterate through the list to check what new events we have gotten, we dont have any old connections laying around.
Inside the "Clean up connections" block below, we iterate through our connection list and just simply remove any stale connections.
    // Clean up connections
    for (int i = 0; i < m_Connections.Length; i++)
    {
        if (!m_Connections[i].IsCreated)
        {
            m_Connections.RemoveAtSwapBack(i);
            --i;
        }
    }
Under "Accept new connections" below, we add a connection while there are new connections to accept.
    // Accept new connections
    NetworkConnection c;
    while ((c = m_Driver.Accept()) != default(NetworkConnection))
    {
        m_Connections.Add(c);
        Debug.Log("Accepted a connection");
    }
Now we have an up-to-date connection list. You can now start querying the driver for events that might have happened since the last update.
    DataStreamReader stream;
    for (int i = 0; i < m_Connections.Length; i++)
    {
        if (!m_Connections[i].IsCreated)
            continue;
Begin by defining a DataStreamReader. This will be used in case any Data event was received. Then we just start looping through all our connections.
For each connection we want to call PopEventForConnection while there are more events still needing to get processed.
    NetworkEvent.Type cmd;
    while ((cmd = m_Driver.PopEventForConnection(m_Connections[i], out stream)) != NetworkEvent.Type.Empty)
    {
There is also the NetworkEvent.Type PopEvent(out NetworkConnection con, out DataStreamReader slice) method call, that returns the first available event, the NetworkConnection that its for and possibly a DataStreamReader.
We are now ready to process events. Lets start with the Data event.
    if (cmd == NetworkEvent.Type.Data)
    {
Next, we try to read a uint from the stream and output what we have received:
    uint number = stream.ReadUInt();
    Debug.Log("Got " + number + " from the Client adding + 2 to it.");
When this is done we simply add two to the number we received and send it back. To send anything with the NetworkDriver we need a instance of a DataStreamWriter. A DataStreamWriter is a new type that comes with the com.unity.transport package. You get a DataStreamWriter when you start sending a message by calling BeginSend.
After you have written your updated number to your stream, you call the EndSend method on the driver and off it goes:
    number +=2;

    m_Driver.BeginSend(NetworkPipeline.Null, m_Connections[i], out var writer);
    writer.WriteUInt(number);
    m_Driver.EndSend(writer);
    }
We are passing NetworkPipeline.Null to the BeginSend function. This way we say to the driver to use the unreliable pipeline to send our data. it's also possible to not specify a pipeline.
Finally, you need to handle the disconnect case. This is pretty straight forward, if you receive a disconnect message you need to reset that connection to a default(NetworkConnection). As you might remember, the next time the Update loop runs you will clean up after yourself.
                else if (cmd == NetworkEvent.Type.Disconnect)
                {
                    Debug.Log("Client disconnected from server");
                    m_Connections[i] = default(NetworkConnection);
                }
            }
        }
    }
That is the whole server. See ServerBehaviour.cs for the full source code.
Creating a Client
The client code looks pretty similar to the server code at first glance, but there are a few subtle differences. This part of the workflow covers the differences between them, and not so much the similarities.
ClientBehaviour.cs
You still define a NetworkDriver but instead of having a list of connections we now only have one. There is a Done flag to indicate when we are done, or in case you have issues with a connection, you can exit quickly.
Filename: Assets\Scripts\ClientBehaviour.cs
using ...

public class ClientBehaviour : MonoBehaviour {

    public NetworkDriver m_Driver;
    public NetworkConnection m_Connection;
    public bool Done;

    void Start () { ... }
    public void OnDestroy() { ... }
    void Update() { ... }
}
Creating and Connecting a Client
Start by creating a driver for the client and an address for the server.
void Start () {
    m_Driver = NetworkDriver.Create();
    m_Connection = default(NetworkConnection);

    var endpoint = NetworkEndPoint.LoopbackIpv4;
    endpoint.Port = 9000;
    m_Connection = m_Driver.Connect(endpoint);
}
Then call the Connect method on your driver.
Cleaning up this time is a bit easier because you don’t need a NativeList to hold your connections, so it simply just becomes:
public void OnDestroy()
{
    m_Driver.Dispose();
}
Client Update loop
You start the same way as you did in the server by calling m_Driver.ScheduleUpdate().Complete(); and make sure that the connection worked.
void Update()
{
    m_Driver.ScheduleUpdate().Complete();

    if (!m_Connection.IsCreated)
    {
        if (!Done)
            Debug.Log("Something went wrong during connect");
        return;
    }
You should recognize the code below, but if you look closely you can see that the call to m_Driver.PopEventForConnection was switched out with a call to m_Connection.PopEvent. This is technically the same method, it just makes it a bit clearer that you are handling a single connection.
    DataStreamReader stream;
    NetworkEvent.Type cmd;
    while ((cmd = m_Connection.PopEvent(m_Driver, out stream)) != NetworkEvent.Type.Empty)
    {
Now you encounter a new event you haven't seen yet: a NetworkEvent.Type.Connect event.
This event tells you that you have received a ConnectionAccept message and you are now connected to the remote peer.
In this case, the server that is listening on port 9000 on NetworkEndPoint.LoopbackIpv4 is more commonly known as 127.0.0.1.
    if (cmd == NetworkEvent.Type.Connect)
    {
        Debug.Log("We are now connected to the server");

        uint value = 1;
        m_Driver.BeginSend(m_Connection, out var writer);
        writer.WriteUInt(value);
        m_Driver.EndSend(writer);
    }
When you establish a connection between the client and the server, you send a number (that you want the server to increment by two). The use of the BeginSend / EndSend pattern together with the DataStreamWriter, where we set value to one, write it into the stream, and finally send it out on the network.
When the NetworkEvent type is Data, as below, you read the value back that you received from the server and then call the Disconnect method.
A good pattern is to always set your NetworkConnection to default(NetworkConnection) to avoid stale references.
    else if (cmd == NetworkEvent.Type.Data)
    {
        uint value = stream.ReadUInt();
        Debug.Log("Got the value = " + value + " back from the server");
        Done = true;
        m_Connection.Disconnect(m_Driver);
        m_Connection = default(NetworkConnection);
    }
Lastly, we need to handle potential server disconnects:
            else if (cmd == NetworkEvent.Type.Disconnect)
            {
                Debug.Log("Client got disconnected from server");
                m_Connection = default(NetworkConnection);
            }
        }
    }
See ClientBehaviour.cs for the full source code.
Putting it all together
To take this for a test run, you can add a new empty GameObject to our Scene.

Add add both of our behaviours to it:
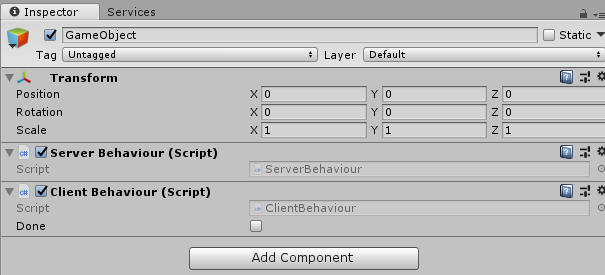
Click Play. Five log messages should load in your Console window: