Client-server quickstart
Use this guide to learn how to create your first client-server Netcode for GameObjects project. It walks you through creating a simple Hello World project that implements the basic features of Netcode for GameObjects.
Refer to Testing the command line helper to learn how to test your builds with a command-line helper.
Prerequisites
Before you begin, you need the following:
- An active Unity account with a valid license.
- The Unity Hub.
- A supported version of the Unity Editor. Refer to the Netcode for GameObjects requirements.
Before continuing, create a new project using Unity Editor version 2022.3 or later.
Create an Assets/Scripts/ folder
If you don't already have an Assets/Scripts/ folder, create one now:
- Right-click the Assets folder in the Projects tab, then select Create > Folder.
- Name the new folder Scripts.
This is where you'll keep all your scripts as part of this Hello World project.
Install Netcode for GameObjects
Refer to Install Netcode for GameObjects.
Add the basic components
This section guides you through adding the essential components of a networked game:
Create the NetworkManager component
This section guides you through creating a NetworkManager component.
First, create the NetworkManager component:
- Right-click in the Hierarchy tab, then select Create Empty to create an empty GameObject.
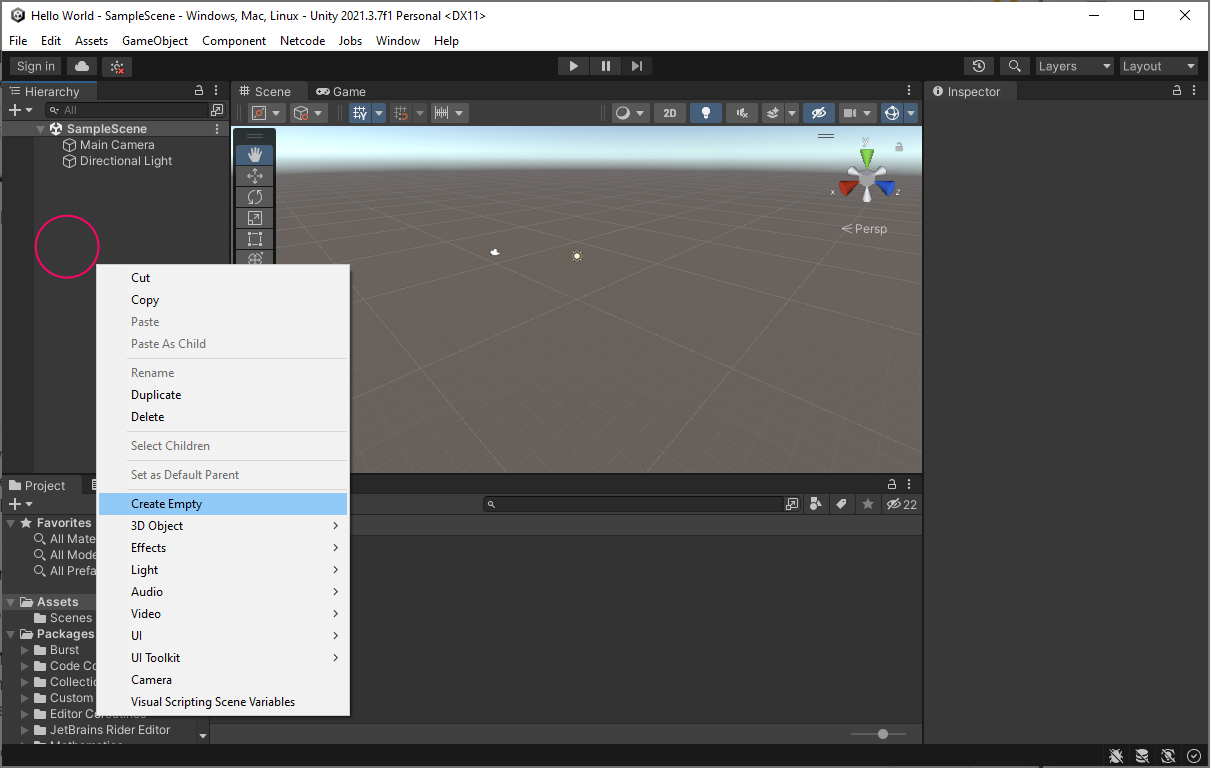
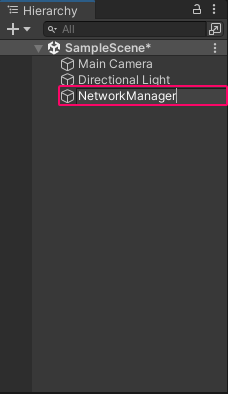
- Rename the empty GameObject NetworkManager.
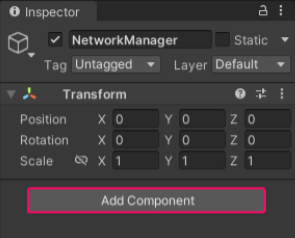
- Select NetworkManager, then select Add Component from the Inspector tab.
- Select Netcode > NetworkManager from the component list.
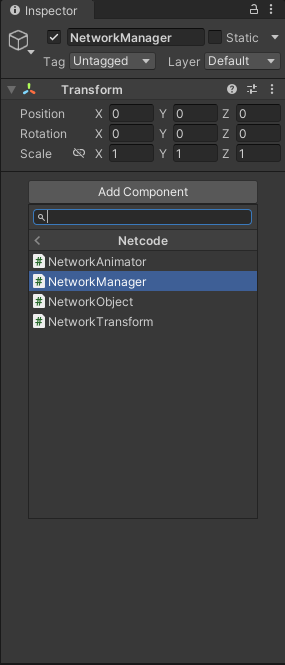
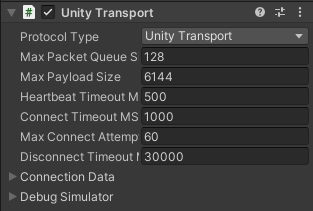
- In the Inspector tab, locate the Unity Transport section, then select UnityTransport as the Protocol type.
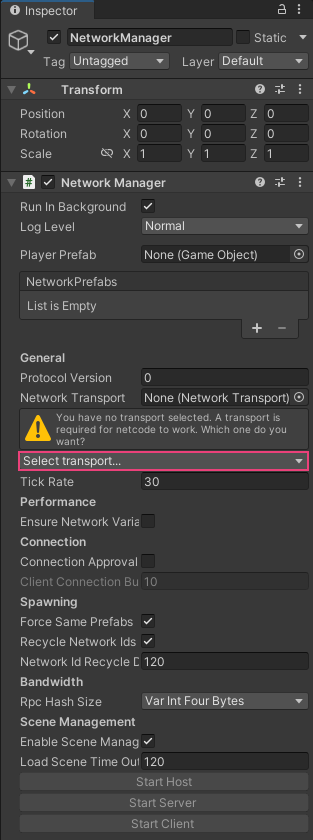
- Save the scene by pressing Ctrl/Cmd + S (or by selecting File > Save).
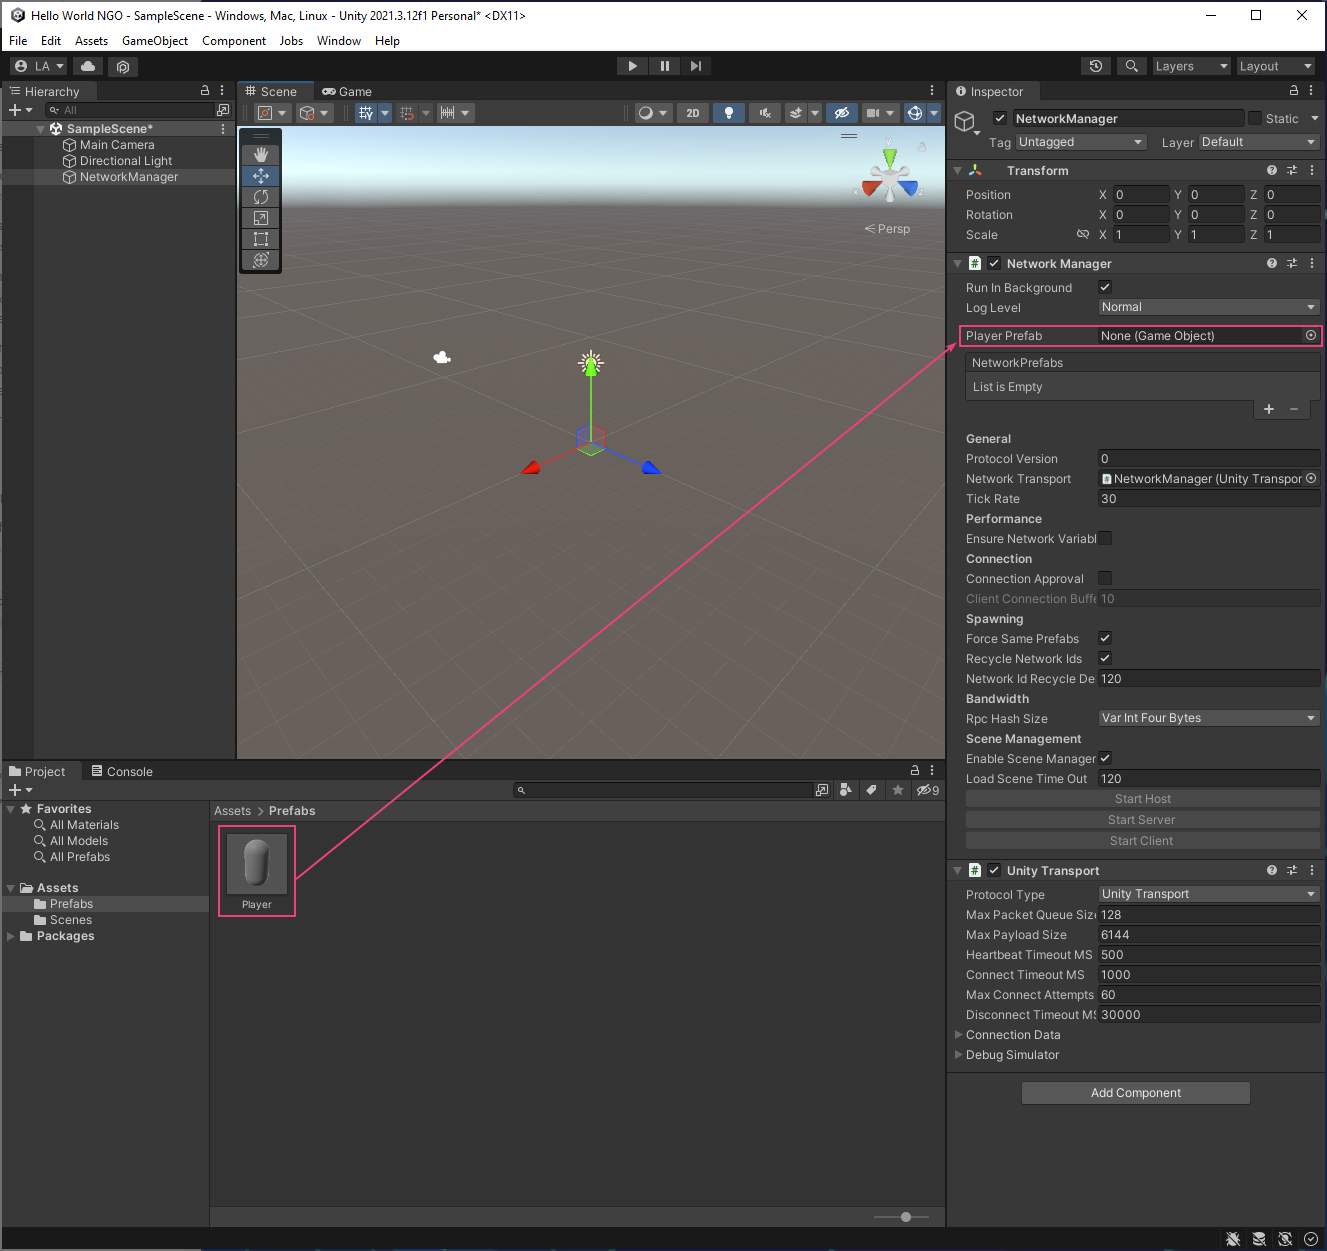
Create an object to spawn for each connected player
When you drop the prefab into the PlayerPrefab slot, you're telling the library that when a client connects to the game, it automatically spawns this prefab as the character for the connecting client. Netcode for GameObjects won't spawn a player object if you don't have any prefab set as the PlayerPrefab. Refer to Player Objects.
This section guides you through creating an object that spawns for each connected player.
- In the Unity Editor, right-click within the Hierarchy tab, then select 3D Object > Capsule.
- Name the Capsule Object Player.
- With Player selected, add a NetworkObject component in the Inspector tab by selecting Add Component > Netcode > NetworkObject.
- Right-click within the Assets folder under the Project tab, then select Create > Folder.
- Name the folder Prefabs.
- Make the Player object you created earlier into a prefab by dragging it from the Hierarchy tab into the Prefabs folder.
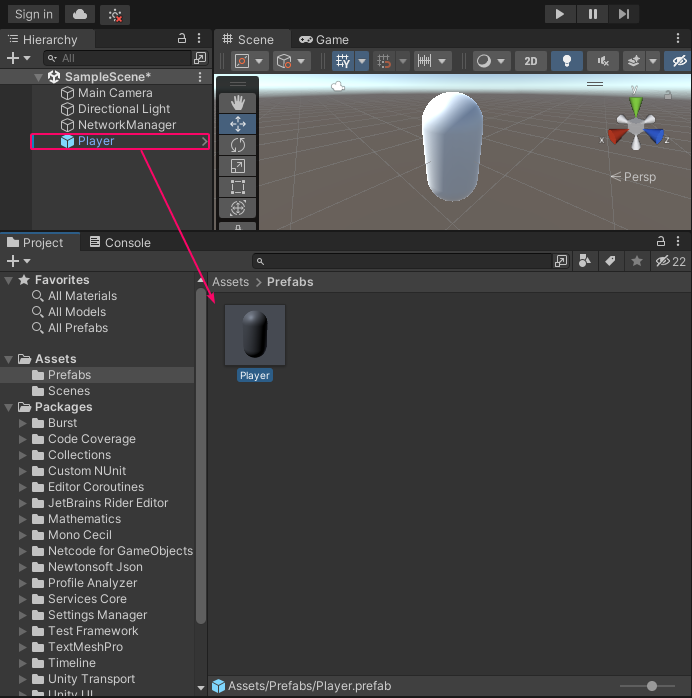
- Delete the Player from the scene by selecting the Player capsule within the Scene tab, then pressing the Delete key (or Cmd + Delete for macOS).
- You can remove the Player GameObject from the scene because you assign this network prefab to the Player prefab property in the NetworkManager component. The library doesn't support defining a player object as an in-scene placed NetworkObject.
- Select NetworkManager.
- With NetworkManager selected, locate the PlayerPrefab field in the Inspector tab.
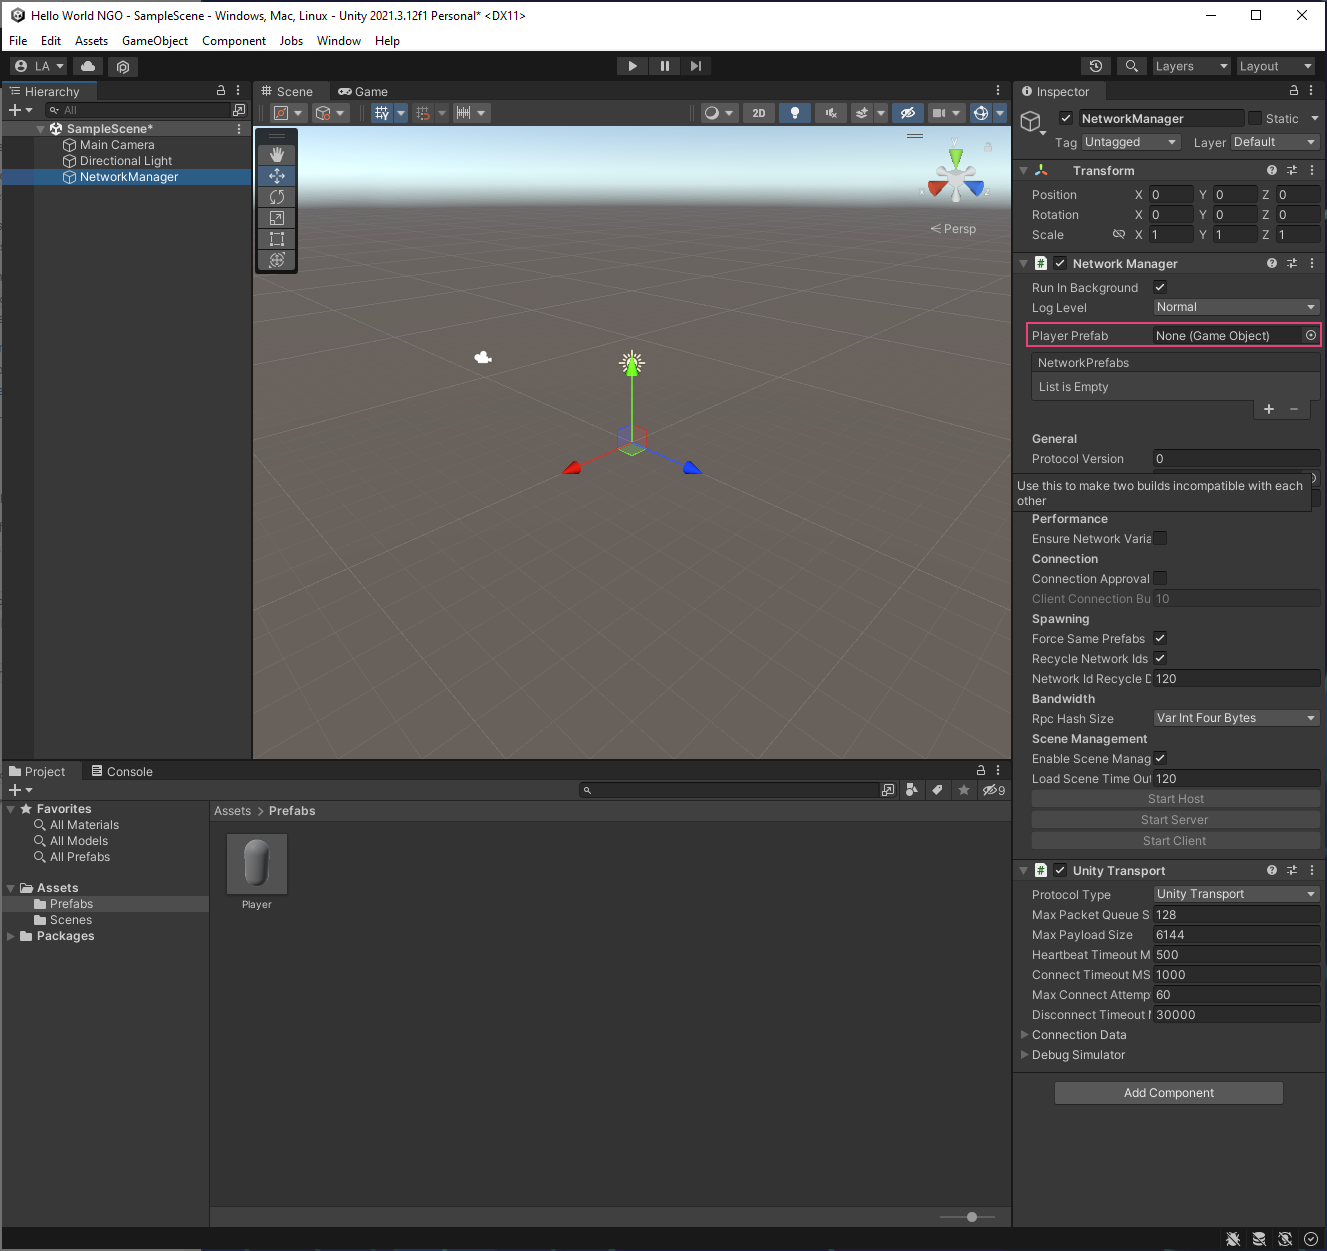
- Drag the Player prefab from the Project tab into the PlayerPrefab slot within the NetworkManager component in the Inspector tab.
Add a 3D Plane (centered at 0,0,0) to the scene by right-clicking in the Hierarchy tab, then selecting 3D Object > Plane.
* Adding the Plane adds a visual reference point to visualize the Player prefab's position, but it isn't necessary.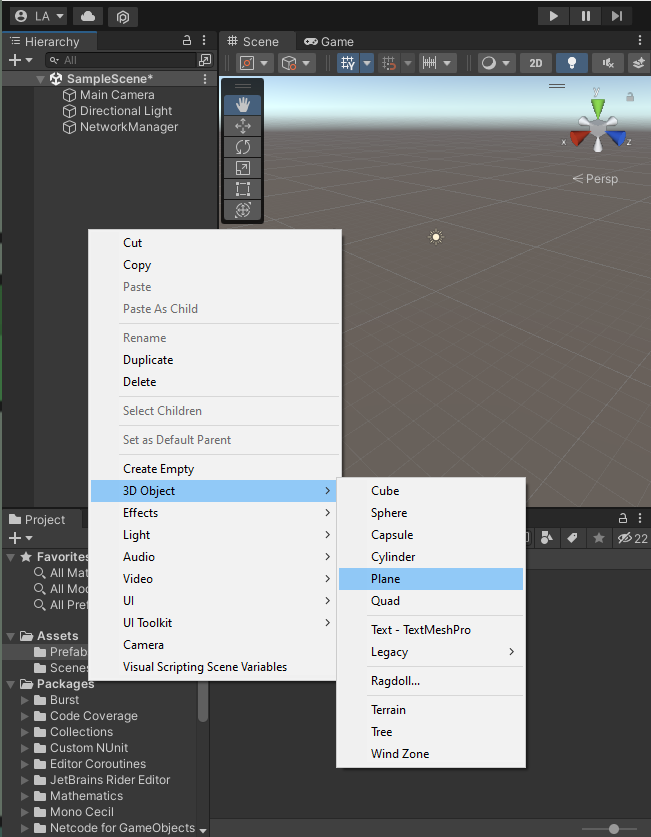
Save the scene by pressing Ctrl/Cmd + S (selecting File > Save).
Scene management and the scenes in build list
Netcode for GameObjects comes with an integrated scene management solution that helps you synchronize what scenes should be loaded by all connected clients. The NetworkManager Enable Scene Management property, enabled by default, determines whether the integrated scene management solution will be used for your project (or not). In order for the integrated scene management solution to work properly, you must add any scene you want to be synchronized to the scenes in build list. This section guides you through adding your current scene to the scenes in build list.
- Open the Build Settings window by selecting File > Build Settings.
- Select Add Open Scenes.
- Scenes/SampleScene is listed under Scenes In Build. You can close the Build Settings window.
Test starting a host in the Unity Editor
Now that you have a NetworkManager, assigned a PlayerPrefab, and added your current scene to the scenes in build test, you can quickly verify everything is functioning/configured correctly via entering play mode in the Unity Editor. By starting a host, you are starting NetworkManager as both a server and a client at the same time.
You can test your Hello World project using the Unity Editor or a command-line helper. If you choose the latter, refer to Create a command line helper. Otherwise, refer to the following instructions to test using the Unity Editor. Only the Plane appears on the server until the first client connects. Then, Netcode for GameObjects spawns a new Player prefab for each connected client; however, they overlap in the Game view.
- Select Play from the top of the Unity Editor to start the scene.
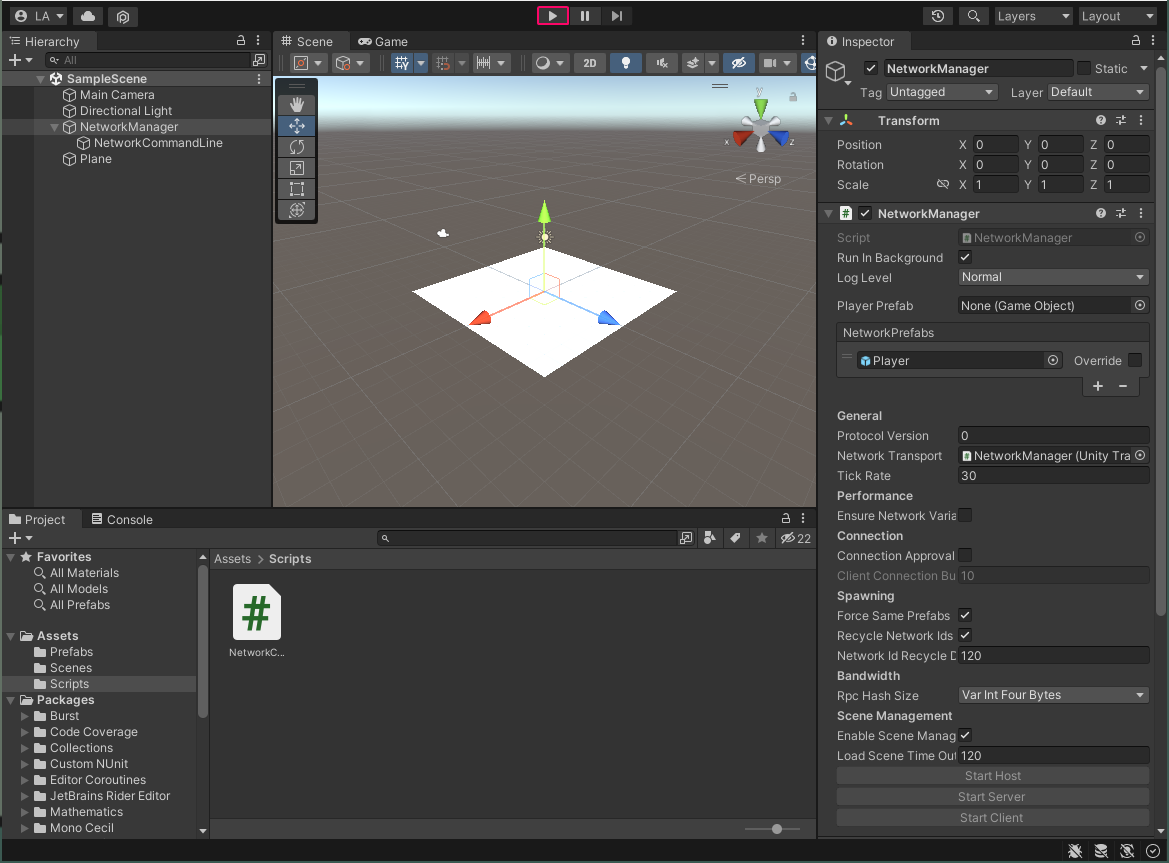
- Select NetworkManager from the Hierarchy list.
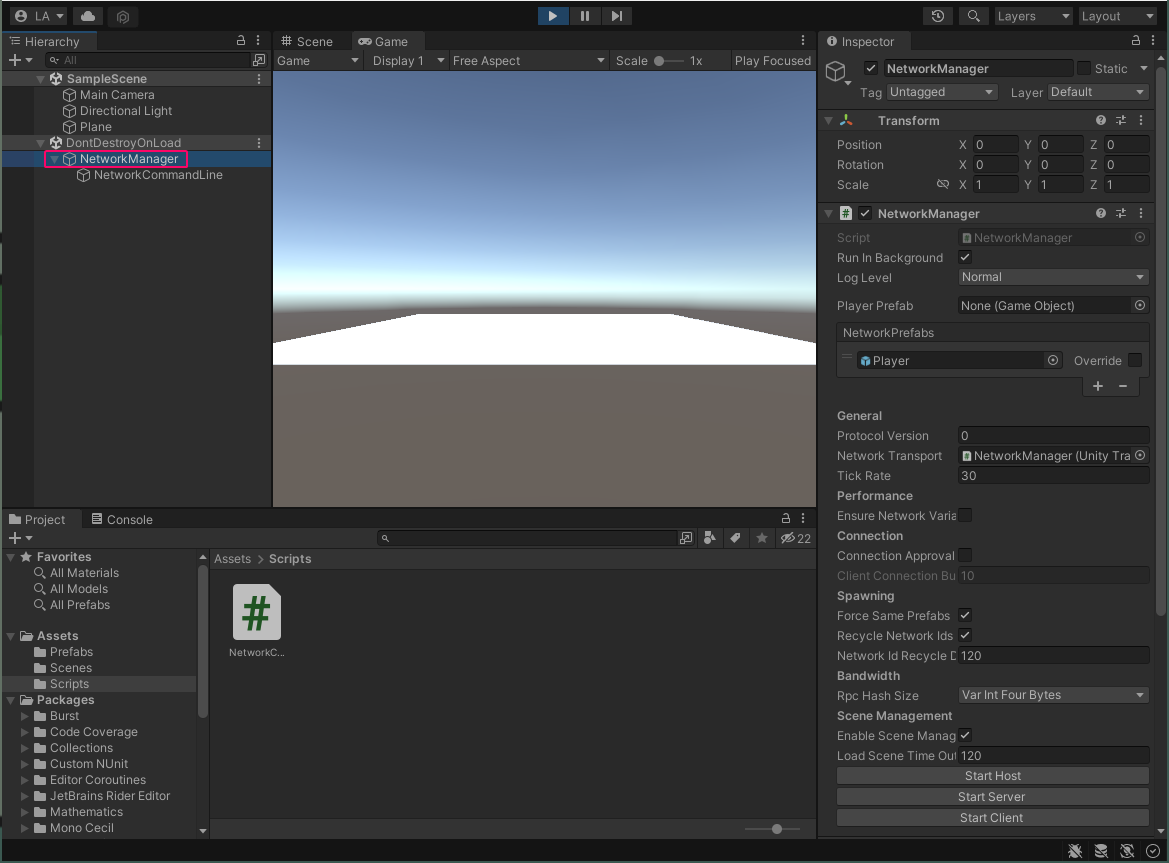
- With NetworkManager selected (in the Hierarchy tab), select Start Host from the Inspector tab. Alternatively, you can use the in-game GUI buttons.
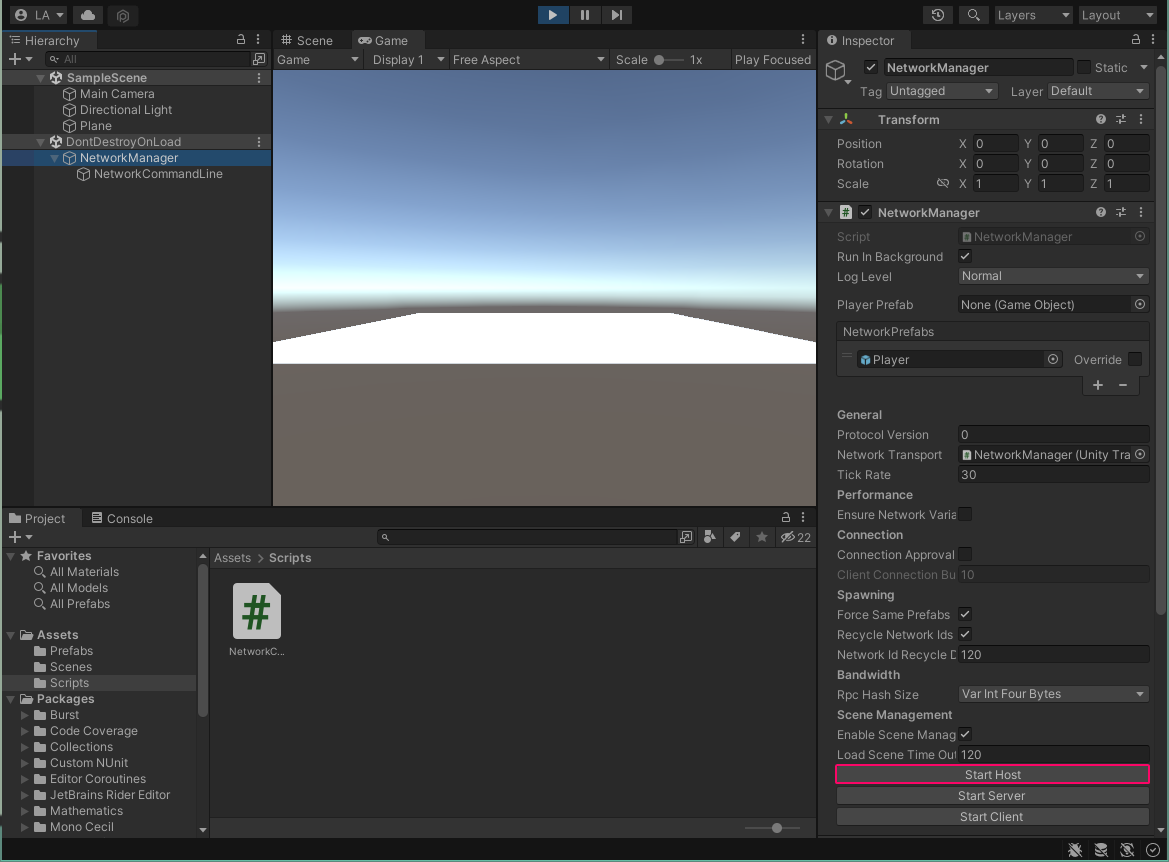
If it works correctly, the option to Stop Host displays in the Inspector tab.
The HelloWorldManager.cs script
Now that you have verified everything is configured correctly, you will want to have the ability to start the NetworkManager whether in play mode, as a stand alone build, or in another MPPM instance. This section will walk you through creating the HelloWorldManager.cs component script.
- Create a new script in the
Scriptsfolder namedHelloWorldManager.cs. - Add this component to the
NetworkManagerGameObjectin your scene. - Copy the following code into the
HelloWorldManager.csscript:
using Unity.Netcode;
using UnityEngine;

namespace HelloWorld
{
    public class HelloWorldManager : MonoBehaviour
    {
        private NetworkManager m_NetworkManager;

        void Awake()
        {
            m_NetworkManager = GetComponent<NetworkManager>();
        }

        void OnGUI()
        {
            GUILayout.BeginArea(new Rect(10, 10, 300, 300));
            if (!m_NetworkManager.IsClient && !m_NetworkManager.IsServer)
            {
                StartButtons();
            }
            else
            {
                StatusLabels();

                SubmitNewPosition();
            }

            GUILayout.EndArea();
        }

        static void StartButtons()
        {
            if (GUILayout.Button("Host")) m_NetworkManager.StartHost();
            if (GUILayout.Button("Client")) m_NetworkManager.StartClient();
            if (GUILayout.Button("Server")) m_NetworkManager.StartServer();
        }

        static void StatusLabels()
        {
            var mode = m_NetworkManager.IsHost ?
                "Host" : m_NetworkManager.IsServer ? "Server" : "Client";

            GUILayout.Label("Transport: " +
                m_NetworkManager.NetworkConfig.NetworkTransport.GetType().Name);
            GUILayout.Label("Mode: " + mode);
        }

        static void SubmitNewPosition()
        {
            if (GUILayout.Button(m_NetworkManager.IsServer ? "Move" : "Request Position Change"))
            {
                if (m_NetworkManager.IsServer && !m_NetworkManager.IsClient )
                {
                    foreach (ulong uid in m_NetworkManager.ConnectedClientsIds)
                        m_NetworkManager.SpawnManager.GetPlayerNetworkObject(uid).GetComponent<HelloWorldPlayer>().Move();
                }
                else
                {
                    var playerObject = m_NetworkManager.SpawnManager.GetLocalPlayerObject();
                    var player = playerObject.GetComponent<HelloWorldPlayer>();
                    player.Move();
                }
            }
        }
    }
}
In your Hello World project, you created a NetworkManager by adding the pre-created NetworkManager component to a GameObject. This component allows you to start a Host, Client, or Server in Play Mode via the inspector view. The HelloWorldManager.cs script simplifies and extends this functionality by creating a runtime/play mode UI menu that allows you to select the three different NetworkManager modes you can start:
- The Host starts the server and joins as a client.
- The Client joins the server as a client player.
- The Server starts the game as a server without instantiating a player.
The HelloWorldManager.cs script accomplishes this menu within the StartButtons(). After you select a button, the StatusLabels()method adds a label on-screen to display which mode you have selected. This helps distinguish Game view windows from each other when testing your multiplayer game.
       static void StartButtons()
        {
            if (GUILayout.Button("Host")) m_NetworkManager.StartHost();
            if (GUILayout.Button("Client")) m_NetworkManager.StartClient();
            if (GUILayout.Button("Server")) m_NetworkManager.StartServer();
        }

        static void StatusLabels()
        {
            var mode = m_NetworkManager.IsHost ?
                "Host" : m_NetworkManager.IsServer ? "Server" : "Client";

            GUILayout.Label("Transport: " +
                m_NetworkManager.NetworkConfig.NetworkTransport.GetType().Name);
            GUILayout.Label("Mode: " + mode);
        }
As seen in the earlier code snippet, the HelloWorldManager.cs script also uses the NetworkManager's instance via its singleton to grab properties like the IsClient, IsServer, and IsLocalClient. The IsClient and IsServer properties dictate the established connection state.
The HelloWorldManager.cs script also introduces a new method called SubmitNewPosition() that the HelloWorldPlayer script uses to create a simple RPC call.
Adding RPCs (Remote Procedure Calls)
This section guides you through adding basic RPCs to the project. Save your scripts in your Assets/Scripts/ folder. RPCs are used to call functions on remote clients or the server.
Create a script named RpcTest.cs:
- In the Project tab, select Assets > Scripts.
- Right-click in the Scripts folder and select Create > C# Script.
- Name the script
RpcTest.
Add the RpcTest.cs script to the Player prefab:
- Select the Player prefab in Assets > Prefabs.
- In the Inspector tab (with the Player prefab selected), select Add Component.
- Select Scripts > Rpc Test.
Edit the RpcTest.cs script:
- In the Project tab, select Assets > Scripts >
RpcTest. - In the Inspector tab (with the script selected), select Open. This opens this script in the default local text editor.
- Edit the
RpcTest.csscript to match the following:
using Unity.Netcode;
using UnityEngine;

public class RpcTest : NetworkBehaviour
{
    public override void OnNetworkSpawn()
    {
        if (!IsServer && IsOwner) //Only send an RPC to the server from the client that owns the NetworkObject of this NetworkBehaviour instance
        {
            ServerOnlyRpc(0, NetworkObjectId);
        }
    }

    [Rpc(SendTo.ClientsAndHost)]
    void ClientAndHostRpc(int value, ulong sourceNetworkObjectId)
    {
        Debug.Log($"Client Received the RPC #{value} on NetworkObject #{sourceNetworkObjectId}");
        if (IsOwner) //Only send an RPC to the owner of the NetworkObject
        {
            ServerOnlyRpc(value + 1, sourceNetworkObjectId);
        }
    }

    [Rpc(SendTo.Server)]
    void ServerOnlyRpc(int value, ulong sourceNetworkObjectId)
    {
        Debug.Log($"Server Received the RPC #{value} on NetworkObject #{sourceNetworkObjectId}");
        ClientAndHostRpc(value, sourceNetworkObjectId);
    }
}
- Save the Scene by pressing Ctrl/Cmd + S (or by selecting File > Save).
Test the RPCs
This section guides you through testing the RPCs you added in the earlier section.
- Select File > Build Setting....
- In the Build Setting window, configure your build settings as needed.
- Click Build and choose a location to save your first build.
- After the first build is done, return to the Build Setting window.
- Click Build again and choose a different location to save your second build.
- Alternatively, you can run the builds by:
- Launching the client and server together in a terminal, as shown in Testing the command line helper.
- Using the Multiplayer Play Mode package, which lets you run multiple instances of the Unity Editor to test multiplayer functionality. Refer to Multiplayer Play Mode to learn more.
- Alternatively, you can run the builds by:
After the client and server spawn, a log displays in the Console of the client and server sending RPC messages to each other.
The client kicks off the exchange in its OnNetworkSpawn call for the first time with a counter value of 0. It then makes an RPC call to the server with the next value. The server receives this and calls the client. The Console displays the following for the server and client respectively.
Server Received the RPC #0 on NetworkObject #1
Server Received the RPC #1 on NetworkObject #1
Server Received the RPC #2 on NetworkObject #1
Server Received the RPC #3 on NetworkObject #1
...
Client Received the RPC #0 on NetworkObject #1
Client Received the RPC #1 on NetworkObject #1
Client Received the RPC #2 on NetworkObject #1
Client Received the RPC #3 on NetworkObject #1
...
Only the client owning the NetworkObject owning the RpcTest script will send RPCs on the server, but they will all receive RPCs from the server. This means that if you test with multiple clients the consoles will log RPCs received once per NetworkObject per iteration on the server and all clients. If testing with a host and a client, you will see the following on the host's Console. This is because as a server it will receive the other client's server RPCs and as a client it will also receive its own client RPCs.
Server Received the RPC #0 on NetworkObject #2
Client Received the RPC #0 on NetworkObject #2
Server Received the RPC #1 on NetworkObject #2
Client Received the RPC #1 on NetworkObject #2
Server Received the RPC #2 on NetworkObject #2
Client Received the RPC #2 on NetworkObject #2
Server Received the RPC #3 on NetworkObject #2
Client Received the RPC #3 on NetworkObject #2
...
The NetworkObjectId here is 2 because the host also has a NetworkObject with the RpcTest script spawned for it, but it won't send the initial RPC starting the chain because it's a server.
Adding Netcode script to your player prefab
At this point, you should have set up script and should have experimented with sending and receiving RPCs via the RpcTest.cs script above. This next step demonstrates how you can add additional netcode logic to your player prefab via the HelloWorldPlayer.cs script.
- Create a new script in the
Scriptsfolder namedHelloWorldPlayer.cs. - Copy the following code into the
HelloWorldPlayer.csscript and save it:
using Unity.Netcode;
using UnityEngine;

namespace HelloWorld
{
    public class HelloWorldPlayer : NetworkBehaviour
    {
        public NetworkVariable<Vector3> Position = new NetworkVariable<Vector3>();

        public override void OnNetworkSpawn()
        {
            if (IsOwner)
            {
                Move();
            }
        }

        public void Move()
        {
            SubmitPositionRequestRpc();
        }

        [Rpc(SendTo.Server)]
        void SubmitPositionRequestRpc(RpcParams rpcParams = default)
        {
            var randomPosition = GetRandomPositionOnPlane();
            transform.position = randomPosition;
            Position.Value = randomPosition;
        }

        static Vector3 GetRandomPositionOnPlane()
        {
            return new Vector3(Random.Range(-3f, 3f), 1f, Random.Range(-3f, 3f));
        }

        void Update()
        {
            transform.position = Position.Value;
        }
    }
}
A Review of the HelloWorldPlayer.cs script
The HelloWorldPlayer.cs script adds some basic movement to the Hello World project player. Both the server player and the client player can start player movement. However, the movement occurs through the server's position NetworkVariable, which means the server player can move immediately, but the client player must request a movement from the server, wait for the server to update the position NetworkVariable, then replicate the change locally.
The HelloWorldPlayer class inherits from Unity.Netcode's NetworkBehaviour instead of MonoBehaviour. This allows you to customize the networking code as you override what happens when the Player spawns.
public class HelloWorldPlayer : NetworkBehaviour
For multiplayer games, every object runs on at least two machines: player one and player two. Because of this, you need to ensure both machines have the same behavior and have the correct information about the object. One of the instances that come into play then is to understand how the Player moves. Only one player controls how the Player object moves. The following code enforces this by validating if the machine running the code is the player's owner.
       public override void OnNetworkSpawn()
        {
            if (IsOwner)
            {
                Move();
            }
        }
Any MonoBehaviour implementing a NetworkBehaviour component can override the Netcode for GameObjects method OnNetworkSpawn(). The OnNetworkSpawn() method fires in response to the NetworkObject spawning. The HelloWorldPlayer class overrides OnNetworkSpawn because clients and the server run different logic. You can override this behavior on any NetworkBehaviour component.
Because the server and client can be the same machine and the Player's owner (aka Host), you want further to differentiate the two and have different Move behavior for each.
If the current player is the server, the code determines a random position to spawn the Player. You can't find the spawn location if the current player is the client. You have to get it from the server.
        public void Move()
        {
            SubmitPositionRequestRpc();
        }

        [Rpc(SendTo.Server)]
        void SubmitPositionRequestRpc(RpcParams rpcParams = default)
        {
            var randomPosition = GetRandomPositionOnPlane();
            transform.position = randomPosition;
            Position.Value = randomPosition;
        }

        void Update()
        {
            transform.position = Position.Value;
        }
Positioning the player using an RPC
This section walks you through the HelloWorldPlayer.cs portion of the script that declares the SubmitPositionRequestRpc RPC.
If the player is a server-owned player at OnNetworkSpawn(), you can immediately move this player, as suggested in the following code.
SubmitPositionRequestRpc();
You can call this Rpc when the player is a client or a server. When you call an Rpc with SendTo.Server on the server side, it executes in the same way as a local function call by default.
The Rpc sets the position NetworkVariable on the server's instance of the player by just picking a random point on the plane.
       [Rpc(SendTo.Server)]
        void SubmitPositionRequestRpc(RpcParams rpcParams = default)
        {
            var randomPosition = GetRandomPositionOnPlane();
            transform.position = randomPosition;
            Position.Value = randomPosition;
        }
The server instance of the player modifies the Position NetworkVariable through the Rpc. If the player is a client, it must apply the position locally inside the Update loop. (Since the two values are the same on the server, the server can run the same logic with no side effects, but you could also add if(IsClient) here.)
       void Update()
        {
            transform.position = Position.Value;
        }
Because the HelloWorldPlayer.cs script handles the position NetworkVariable, the HelloWorldManager.cs script can define the contents of SubmitNewPosition().
       static void SubmitNewPosition()
        {
            if (GUILayout.Button(m_NetworkManager.IsServer ? "Move" : "Request Position Change"))
            {
                var playerObject = m_NetworkManager.SpawnManager.GetLocalPlayerObject();
                var player = playerObject.GetComponent<HelloWorldPlayer>();
                player.Move();
            }
        }
The method in the code block above adds a contextual button that changes depending on whether the client is a server or a client. When you press the button this method creates, it finds your local player and calls Move().
You can now create a build that shows the concepts outlined above.
Create two build instances: one for the host and the other for the client (to join the host's game).
Both build instances can move the player with the GUI button. The server moves the player immediately and replicates the movement on the client.
The client can request a new position, instructing the server to change that instance's position NetworkVariable. After the server updates the position NetworkVariable, the client applies that NetworkVariable position inside its Update() method.
Add the HelloWorldPlayer.cs script to the Player prefab
This section guides you through adding the HelloWorldPlayer.cs script to the Player prefab.
Select the Player prefab:
- From the Project tab, select Assets > Prefabs.
- Select Player.
Add the HelloWorldPlayer.cs script to the Player prefab as a component:
- With the Player prefab selected, select Add Component from the Inspector tab.
- Select Scripts > Hello World > Hello World Player.
Add a NetworkTransform
This section guides you through adding a NetworkTransform component that moves the player. NetworkTransform is a component used to synchronize the position, rotation, and scale of objects across the network.
Add a NetworkTransform component to the Player prefab:
- Select the Player prefab in Assets > Prefabs.
- In the Inspector tab (with the Player prefab selected), select Add Component.
- Select Netcode > NetworkTransform.
Create a script named NetworkTransformTest.cs.
- In the Project tab, go to Assets > Scripts.
- Right-click, then select Create > C# Script.
- Name it
NetworkTransformTest.
Add the NetworkTransformTest script to the Player prefab:
- Select the Player prefab in Assets > Prefabs.
- In the Inspector tab (with the Player prefab selected), select Add Component.
- Select Scripts > Network Transform Test.
Edit the NetworkTransformTest.cs script:
- In the Project tab, select Assets > Scripts >
NetworkTransformTest. - In the Inspector tab (with the script selected), select Open. This opens this script in the default local text editor.
- Edit the
NetworkTransformTest.csscript to match the following:
using System;
using Unity.Netcode;
using UnityEngine;

public class NetworkTransformTest : NetworkBehaviour
{
    void Update()
    {
        if (IsServer)
        {
            float theta = Time.frameCount / 10.0f;
            transform.position = new Vector3((float) Math.Cos(theta), 0.0f, (float) Math.Sin(theta));
        }
    }
}
- Save the scene by pressing Ctrl/Cmd + S (or by selecting File > Save).
Test the NetworkTransform
This section guides you through testing the NetworkTransform you added in the earlier section.
- Select File > Build Setting....
- In the Build Setting window, configure your build settings as needed.
- Click Build and choose a location to save your first build.
- After the first build is done, return to the Build Setting window.
- Click Build again and choose a different location to save your second build.
- Alternatively, you can run the builds by:
- Launching the client and server together in a terminal, as shown in Testing the command line helper.
- Using the Multiplayer Play Mode package, which lets you run multiple instances of the Unity Editor to test multiplayer functionality. Refer to Multiplayer Play Mode to learn more.
- Alternatively, you can run the builds by:
After the client and server spawn, the player capsule moves in a circle on both the client and the server.